Overview
MGS Front-end Builder Documentation v1.0
ArrowHiTech Jsc has achieved more than 6 years of experience working on Magento commerce and completed 2000+ Magento projects so far. Thanks to our rich experience in the realm, our proficient team of Magento developers and managers have designed and developed a lot of useful extensions exploiting great features of Magento.
Version: 1.7+
Author: Magesolution.
Design: Arrowhitech.
1. Install Magento
If you haven't got a Magento website yet, you will have to install a copy of Magento Community Edition open source e-commerce web application before using Emart Responsive Magento theme.
If you already have installed Magento you can skip this section
To install Magento, follow these steps:
- Check if your server is compatible with Magento. Find detailed instructions here - http://www.magentocommerce.com/knowledge-base/entry/how-do-i-know-if-my-server-is-compatible-with-magento
- Check if your server meets Magento's System Requirements - http://www.magentocommerce.com/system-requirements/
- If you want to install sample data, use this document - http://www.magentocommerce.com/knowledge-base/entry/magento-installation-cheat-sheet
Go to link "More information: Installing the Sample Data for Magento" - If you want to better understand Magento configuration, use this document - http://www.magentocommerce.com/knowledge-base/entry/magento-installation-guide
- When your Magento installation is completed successfully you can start theme installation procedure.
2. Install Front-end Builder
2.1 Disable compiler
Go to System -> Tools -> Compilation then disable compiler if it is already enabled, if not, you can skip this step.

2.2 Upload Pack
Using a FTP client to upload content of upload folder to the root folder on your Web Server (usually named public_html). Attention: when you copy content of upload folder to the root folder, it will overwrite some files. Please accept it.
You need to upload all content files in folder step_1 first

Then upload content in folder step_2

If you are using magento version 1.9.2.0 or later, please upload (upload overwrite) all content files from folder path_for_magento_v1.9.2.2 to your magento root folder.
2.3 Refresh Cache
Go to System -> Cache management. Select all, choose refresh action and submit. After that you will see new menu item Mage Solutions. Now log out and login again to refresh access control system

2.4 Create New Theme
Create theme design:
Create new folder with name is your new theme name at app/design/frontend/mgstheme (eg: app/design/frontend/mgstheme/theme1)
Create theme skin:
Create new folder with name is your new theme name at skin/frontend/mgstheme (eg: skin/frontend/mgstheme/theme1)
Config theme:
Go to admin > System > Configuration > Design [General tab] and config same as image bellow:

Now, your front-end have used theme1.
If you want to edit layout and template of the theme, please copy layout and template from app/design/frontend/mgstheme/default to app/design/frontend/mgstheme/theme1 and edit them.
To edit skin of the theme, please copy css files from skin/frontend/mgstheme/default/css to skin/frontend/mgstheme/theme1/css and edit them.
2.5 Install builder elements
When you bought MGS Front-end Builder with element packages. You can login and go to this link to download packages: http://www.magesolution.com/downloadable/customer/products/

– Click to “Community Edition” link to download.
– Unzip your package, you will get a folder name “app”.
– Make sure you have disabled compilation mode:

– Upload “app” folder to your magento root folder
– Go to admin > System > Cache Management to refresh cache
– Logout and login again.
– Now you can use your front-end builder element.
3. Magento Panel
3.1 What is MGS Frontend Builder?
Very easy to answer, It is a front-end Magento pages builder. It allows you to build and configure Homepage, Category page, Product page, CMS page, Shopping cart page... at frontend visually without having to log in the admin back-end.
Wow, so what are the advantages of MGS Frontend Builder?
Visually: You can see directly which you want to build and change
Build Web pages by yourself: You can build or configure the pages on your own basing on available layouts and available components
Drag & Drop: Simple for you to drap & drop the blocks on the page
Grid configuration: It allows you to setup width of blocks with Grid standard (12 columns)
Website configuration: It's easy for you to setup all features for your website such as layouts, background, colors, fonts, extensions, catalog... at Frontend
Enable/disable Inline translation: Flexible and convenient to directly translate the site content into target languages at frontend.
and much more...
3.2 Create Panel Account
![]()
To use panel, you need create an account for frontend, you can create account from admin panel (Customers -> Manage Customers) or register from frontend
After create frontend account, go to admin panel -> Mage Solutions -> MGS Panel

- Enabled: Yes
- Email Accounts to use panel: Email of frontend account
Save config.
Go to frontend, login frontend account
Now you can see "Active Builder" button at bottom right of page.

3.3 General Page Setting
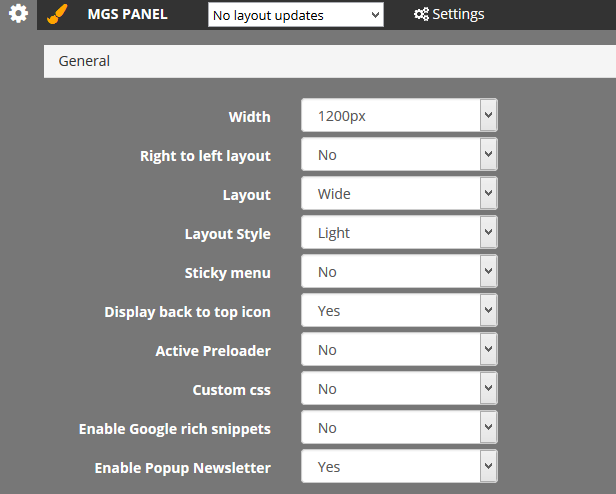
- Width: Width of the page (1024px, 1200px, 1366px, full width)
- Right to left layout: Yes/No
- Layout: Choose style of page is wide or boxed
- Layout Style: Choose style of page is light or dark
- Sticky menu: Anchor menu by mouse scroll
- Display back to top icon: Visible back to top icon on frontend
- Active Preloader: Active preloader icon on page load
- Custom CSS: If you want to custom css by yourself, please choose "Yes", to custom css, please edit the file: skin/frontend/mgstheme/[theme_name]/css/custom.css
- Enable Google rich snippets: More details
- Enable Popup Newsletter: Enable Newsletter popup when customer visit homepage
Background
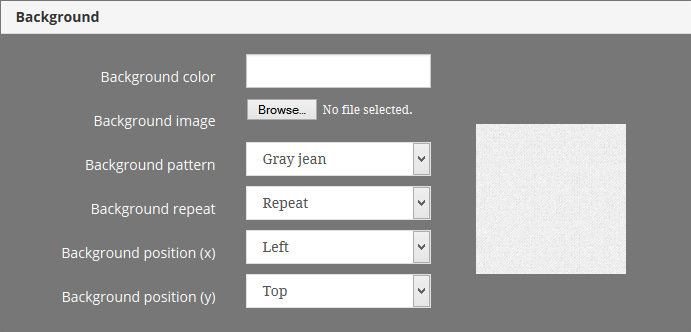
- Background Color: background color of website
- Background Image: background image of website
- Background Pattern: background image pattern (apply for boxed mode)
Fonts

- Default font: font for all text
- Heading 1: font for <h1> tag
- Heading 2: font for <h2> tag
- Heading 3: font for <h3> tag
- Heading 4: font for <h4> tag
- Heading 5: font for <h5> tag
- Heading 6: font for <h6> tag
- Price: font for price
- Menu: font for main menu
Extensions

- Enable Megamenu: disable/enable megamenu extension
- Enable Ajax Add to Cart: disable/enable ajax cart extension
- Enable Quick View: disable/enable quick view extension
- Enable Daily Deals: disable/enable daily deals extension
- Enable Onestep Chekout: disable/enable onestep checkout extension
Catalog
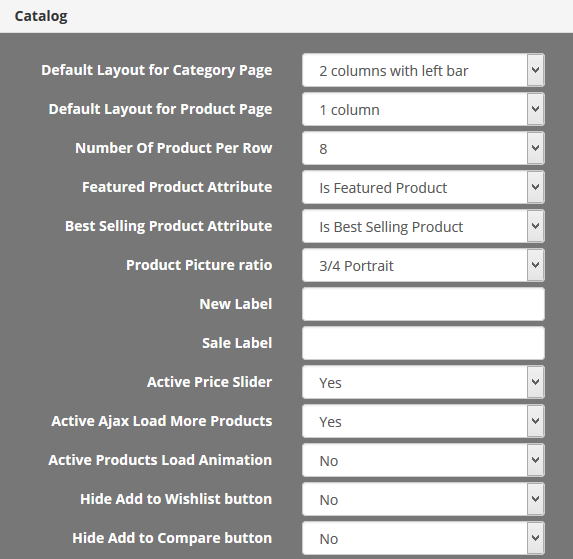
- Default Layout for Category Page: default layout for all category page
- Default Layout for Product Page: default layout for all product page
- Number of products per row: from 1 to 8
- Featured Product Attribute: attribute to set featured products
- Best Selling Product Attribute: attribute to set best selling products
- Product Picture Ratio: set ratio for all product picture
- New Label: label for New products
- Sale Label: label for Sale products
- Active Price Slider: active price slider filter on category page
- Active Load more products: replace pager by ajax load more on category page
3.4 Change Page Layout

You can change layout for:
- Category Page
- Catalog Search Page
- Product Page
- My account Page
- Blog Page
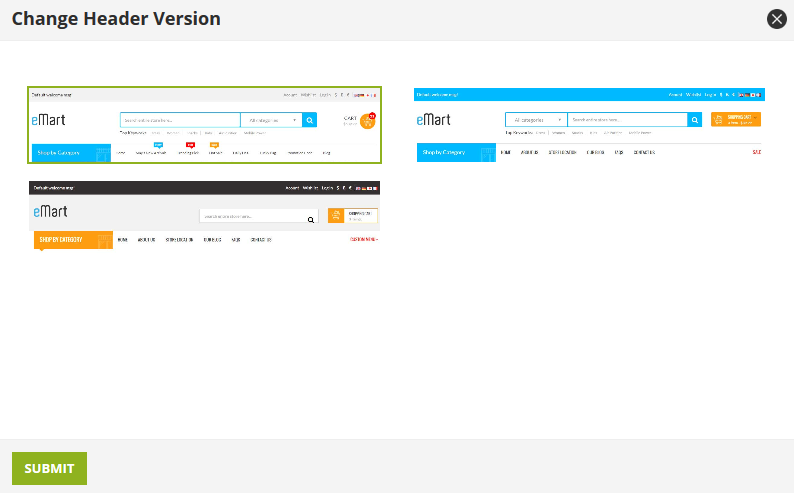
3.5 Change Header
First, you need to copy all content from app/design/frontend/mgstheme/default/template/page/html/header to app/design/frontend/mgstheme/theme1/template/page/html/header
Create header thumbnails at skin/frontend/mgstheme/theme1/asset/headers for your theme
![]()
At frontend, after active builder, click to setting icon at top left of the header to change header
3.6 Change Footer
First, you need to copy all content from app/design/frontend/mgstheme/default/template/page/html/footer to app/design/frontend/mgstheme/theme1/template/page/html/footer
Create header thumbnails at skin/frontend/mgstheme/theme1/asset/footers for your theme
![]()
At frontend, after active builder, click to setting icon at top left of the footer to change footer

3.7 Edit Logo and Static Block
![]()
- At frontend, after active builder, mouse hover to the logo, you can see edit icon
- Click to edit icon, you can upload logo
- Mouse hover to any static block at header and footer, you can see edit icon
- Click to edit icon, you can edit static block

3.8 Change Category Setting
![]()
At frontend, after active builder, go to any category, you can change setting and seo content of the category

3.9 Edit Category Information
![]()
- At frontend, after active builder, go to any category
- Mouse hover to image or description of category, you can see edit icon
- Click to edit icon, you can upload image and edit description of the category

3.10 Change Product Setting
![]()
At frontend, after active builder, go to any product, you can change setting and seo content of the product

3.11 Edit CMS Page Content
![]()
- At frontend, after active builder, go to any cms page
- You can see edit icon at top right of content
- Click to edit icon, you can edit content of the page

3.12 Edit Contact Us Information
![]()
- At frontend, after active builder, go to contact us page
- Click edit icon at top left of map to edit map information
- Hover to text content and click edit icon to edit map information


3.13 Manage Left block, Right block
At frontend, after active builder, you can add or remove:- Static block
- Category Navigation
- Sub Category (just for category page)
- Layered Navigation (just for category page)
- Cart Sidebar
- Compare Sidebar
- Reorder Sidebar
- Poll
- Viewed Products
- Wishlist Sidebar
- Tag Popular
- NewsLetter
- Promo Banner
- Menu
- Featured Products
- Bestselling Products
- New Products
- Top Rate Products
- Sale Products
- Facebook Like box
- Tweeter Feed
From left sidebar and right sidebar of:
- Category page
- Catalog Search page
- Product page
- Cms page
- My account page

3.14 Copy Homepage content
![]()

4. Homepage Builder
Change Homepage Layout
![]()
Check "Use Builder", choose a layout and click "Update" button to use homepage builder, uncheck "Use Builder" to use default cms page
- You can add, remove, edit setting, change position of a section
- You can add, remove, edit, change column of block
- Drag and drop to sort block on each section
- Change appear animation for each block
- Custom block title, class…
- Change settings for the section, add background, padding top, padding bottom, choose parallax section, custom class
Manage Sections
![]()

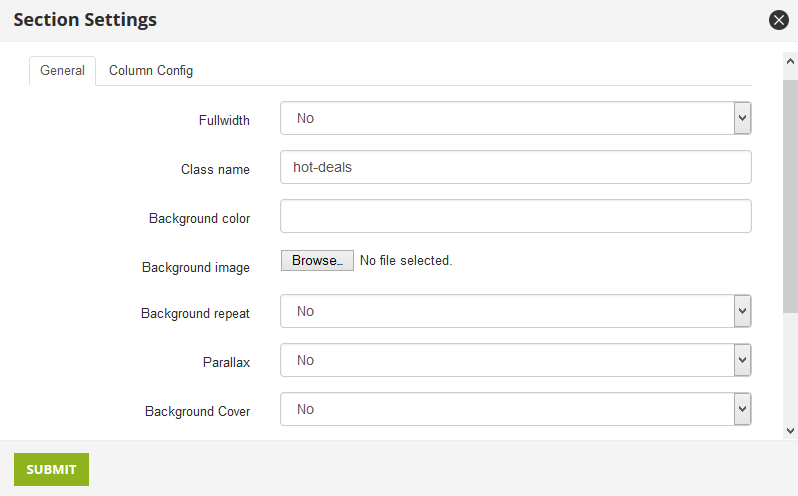
- Fullwidth: set fullwidth for section or not
- Class name: custom class for section
- Background color: background color for section
- Background Image: background image for section
- Background Repeat: repeat for background image or not
- Parallax: Use parallax or not
- Background Cover: Set full with for background image or not
- Padding top: padding top of section
- Padding bottom: padding bottom of section

- Divide Columns: Divide this section to multiple columns
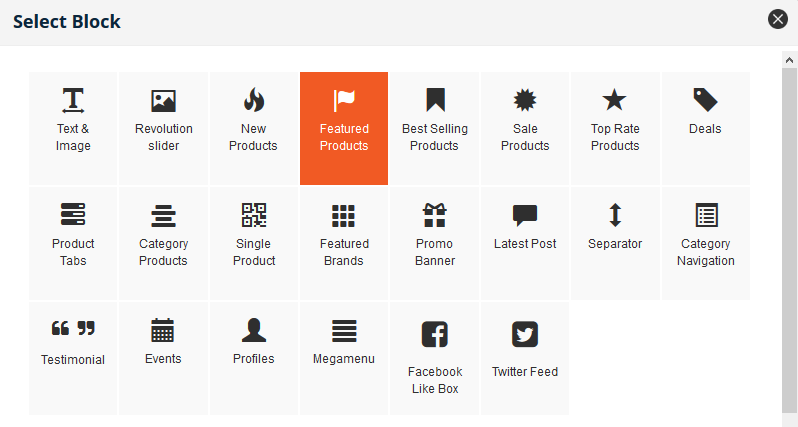
Add Block for Section
At home page, for any section, you can see button:
Click to the button to add new block

Multiple block types can be added (22 blocks):
- Static Block
- Revolution Slider
- New products
- Featured Products
- Best selling Products
- Sale Products
- Top Rate Products
- Daily Deals
- Product Tabs
- Category Product
- Single Product
- Featured Brands
- Promo Banner
- Latest Posts
- Separator
- Category Navigation
- Testimonial
- Events
- Profiles
- Megamenu
- Facebook Like Box
- Twitter Feed
- Block col (12 to full):

- Custom Class: custom class of the block
- Block Animation: animation effect of the block when page load
- Animation Delay: delay of animation effect
Add Static Block
![]()

Add Revolution Slider
We are using "Magento Responsive Slider Revolution Extension - AM Revolution Slider". You can find more information at: http://www.arexmage.com/am-revolution-slider.html![]()
The first, from admin, go to AM->AM Revolution Slider->Manage Slider to add new slider


Choose slider to add

Add New Products Block

To set new product, please read step 1 from this link: http://www.magentocommerce.com/knowledge-base/entry/adding-new-products-list-to-home-page
![]()


- Number of Product: limit number of new product to show
- View mode: Grid/List
- Number of product per row: Number of product visible per row
- Product picture ratio: ratio of the product image
- Use slider: Use slider or not
- Visible load more button: (apply for grid mode)
Add Featured Products Block

![]()
- Go to Catalog -> Attributes -> Manage Attributes
-
Click Add New Attribute button

- Attribute Code: Your featured products attribute code (eg. featured)
- Catalog Input Type for Store Owner: Choose Yes/No
- Click tab Manage Label/Options
- Fill out your attribute label (eg. Featured Product)
- Click Save Attribute button
- Go to Catalog -> Attribute ->Manage Attribute Sets
- Click your attribute set (eg. Default)

- Drag and drop the attribute to a group
- Click Save Attribute Set button
- Go to Catalog -> Manage Products

- Check products you want to show as featured ones on homepage
- Action: Choose Update Attributes
- Click Submit button
- Find Featured Product attribute and change value to yes as follows:

- Click Save button


- Number of Product: limit number of new product to show
- View mode: Grid/List
- Number of product per row: Number of product visible per row
- Product picture ratio: ratio of the product image
- Use slider: Use slider or not
- Visible load more button: (apply for grid mode)
Add Best Selling Products Block

![]()
If you haven't got an attribute to set best selling products, you need to create an attribute and add it to your attribute set, if you have one, please skip this step
To create Best selling product, please follow create featured product, change attribute code to best_selling, change attribute label to Best Selling
At frontend, choose attribute for best selling products and update config:
Add new block


- Number of Product: limit number of new product to show
- View mode: Grid/List
- Number of product per row: Number of product visible per row
- Product picture ratio: ratio of the product image
- Use slider: Use slider or not
- Visible load more button: (apply for grid mode)
Add Featured Brands Block

![]()
To add brand images, at back-end, go to Mage solutions->Brand->Manage Brands
At frontend, add new block:


Add Product Tabs Block

![]()
We create five tabs for: new products, featured products, best selling products, sale products, top rate products
At frontend, add new block:


Add Daily Deals Block

![]()
Set Deals:
- In admin panel, go to Catalog -> Manage Products
- Choose a product and click “Prices” tab
- Set "Special Price" (Special Price < Price)
-
Set "Special Price From Date" and "Special Price To Date":
- If ["Special Price From Date" < now < "Special Price To Date"] then "Status" of deal will be "Running"
- If [now < "Special Price From Date" < "Special Price To Date"] then "Status" of deal will be "Processing"
- Set "Deal Quantity": This is maximum quantity for deal (only works for simple products).
- Save product.

At frontend, add new block:


Add Single Product

![]()
At frontend, add new block:


Add Promo Banner Block

![]()
At frontend, add new block:


- Link: Url to redirect when mouse click
- Button: button text, ex: Click here, View details... (Optional)
- Background Image: upload banner image
- Html content: any content (text, html)
- Text align: align of html content
For effect of promo banner when mouse hover, you need to add class for custom class.
There are class list you can use:
- effect-blur
- effect-blur2
- effect-zoomin
- effect-zoomout
- effect-dark
- effect-bright
- effect-apollo
- effect-chico
- effect-roxy
- effect-ming
- effect-jazz
Add Latest Post Block

![]()
For blog module, we are using AW_Blog extension


- Categories to show: Categories of blog posts, you can select multiple category
- Number of blog post: number of blog post to show
- View mode: Grid/List/Category Tabs
- Use Slider: Use slider or not
Add Separator Block
![]()
At frontend, add new block:


- Separator Type: type of separator (Border/White space)
- Border type: width of border (Full/Medium/Small), apply for border mode
- Icon: icon to show at middle of the border, apply for border mode
- Text Content: Text to show at middle of the border, apply for border mode
Add Category Product Block

![]()
At frontend, add new block:


- Number of Products per row: number of products to show for per category
- View Mode: Category List/Category Tabs
- Category: check category to show products
Add Testimonial Block

![]()
At frontend, add new block:

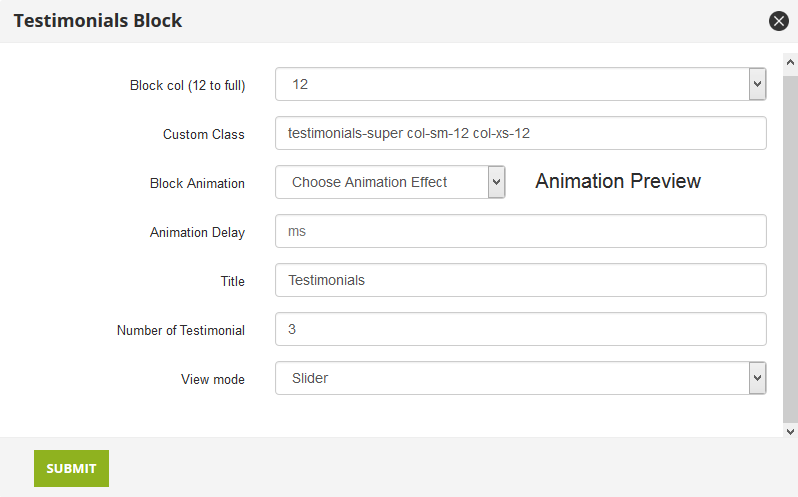
- Number of Testimonial: number of testimonial to show
- View mode: Slider/List
Add Events Block

![]()
To add new event, please go to back-end, Mage Solutions -> Events -> Manage Events
At frontend, add new block:


- Number of Events: number of events to show
- Summary Character Count: count of character will show
- Show Begin Time: display time of event
- View mode: Grid/List
- Number of event per row: number of event to show per row
Add Profiles Block

![]()
To add new profile, please go to back-end, Mage Solutions -> Profiles
At frontend, add new block:


Add Facebook Like Box Block

![]()
To add facebook like box block, first, you need setting for Facebook AppId and Facebook Secret Key
At top panel, click to setting icon, under Socials section

At frontend, add new block:


- Page Id: page id of your facebook
- Number of friend face: number of your friend on facebook to display
- Width: width of the box
- Height: height of the box
Add Twitter Feed

![]()
To add twitter feed block, first, you need setting for Twitter information
At top panel, click to setting icon, under Socials section

At frontend, add new block:


- Twetter User: username of your twitter account
- Number of tweets: number feeds to show
- Character Count: number of character will show for per feed
5. Custom Class
To add custom class to a block:
At front-end, active builder.Hover to block you want to add custom class, you can see some link icons, please click to edit icon:

You can add custom class at "Custom Class" field
There are class list you can use:
6. How To
6.1 Add Vertical Menu

![]()
Emart theme have a vertical megamenu, when you install theme, the vertical menu will not show. To show vertical menu, you need to create vertical menu and add it to static block
First, please create a vertical menu.
- From back-end, go to Mage Solutions -> Megamenu -> Manage Menu
- Click "Add Menu" button
- Menu Name: Name of this menu
- Menu Type: Vertical Menu
- Status: Enable
After create vertical menu, you need to add this menu to static block.
Please copy the code same this {{block type="megamenu/vertical" menu_id="2" template="megamenu/vertical.phtml"}} at the list of menus (maybe menu_id will different for your site)

At frontend, active builder and hover to the vertical menu then click to the edit icon

Paste the code you have copied below this code <div class="img-vertical-menu"> and save block
After save block, you need to add items for vertical menu
From back-end, go to Mage Solutions -> Megamenu -> Manage Megamenu Items to add items
6.2 Change Category Landing
Category landing page are pages list all sub categories of current category with sub categories information (category thumbnail image, category description, category name, products count of category).
To perfect for category landing page, you need to upload thumbnail image for categories, you can upload thumbnail for categories at Catalog -> Manage Categories
Emart theme have three landing page layout:
3 Columns
Masonry

Lookbook

To set category landing and change layour for category landing, from frontend, go to category you want to set category landing page
Active builder, click to "Setting" at top panel

- Display Mode: Static Block Only
- CMS Block: Choose layout of category landing page (Emart Landing Category Grid / Emart Landing Category Lookbook / Emart Landing Category Mansory)
Click "Update" button to save your setting
6.3 Add Custom Style
To custom style of your site, you have 2 ways:
Use custom.css:- From front-end, active builder
- Click to setting icon at top panel

- Under General section, "Custom css" choose "Yes"
- Click "Update" button to save
- Now, you can open the file: skin\frontend\mgstheme\[theme_name]\css\custom.css on your host to edit.
- From back-end, go to Mage Solution -> Theme Settings
-
Expand "Add custom Style" section to add custom style by your self

- Add custom font: you can upload new font to customize your style
- To add custom font, you need enter font-name and upload .ttf file, .eot file, .woff file, and .svg file
- Custom style: you can custom style here
6.4 Setup Multi Languages
To setup multi languages, you can go to System -> Manage Stores
Click Create Store View button

- Store: choose your Main store
- Name: Language
- Code: code for this language.
Press Save button
Go to System -> Configuration -> General

- Choose a store view (language) you have created
- Choose the Country of this store view (language)
- Choose locale of this store view (language)
Press Save Config button
6.5 Setup Currency
To setup currency, you can go to System -> Configuration, choose Currency Setup tab. Set Allowed Currencies are the currency you want on your store.
Go to System -> Mange Currency Rates, press import. Wait for the system to import currency exchange rate then press Save.
Go to System -> Cache Management and refresh the cache. Now you should see currency dropdown on the top left corner.
6.6 Enable Translate Inline
To enable translate inline for any store view, at front-end, go to store view you want to enable translate inline, active builder.
At top panel, please click to this icon ![]() to enable translate inline.
to enable translate inline.
Now you can translate for this store view
When you done, don't forget disable translate inline for this store view. To disable translate inline, please click to this icon ![]()
6.6 Create new Headers
To create new headers (eg: header 3) please follow there steps:
- Create new file name "header3.phtml" at app\design\frontend\mgstheme\default\template\page\html\header (you can copy content from header2.phtml and change html structure for this header)
- Create new file name "header3.phtml" at app\design\frontend\mgstheme\default\template\page\html\header\admin, this file is file for admin when admin loged with frontend builder account to edit static block and logo of the header, in this file you need add some class for div tag (eg: builder-container, inline-builder) and call some functions (eg: $helper->getEditLogoPanel()), you can open this file to see example app\design\frontend\mgstheme\default\template\page\html\header\admin\header2.phtml
- Create new screenshot file name "header3.jpg" for this header at skin\frontend\mgstheme\default\asset\headers